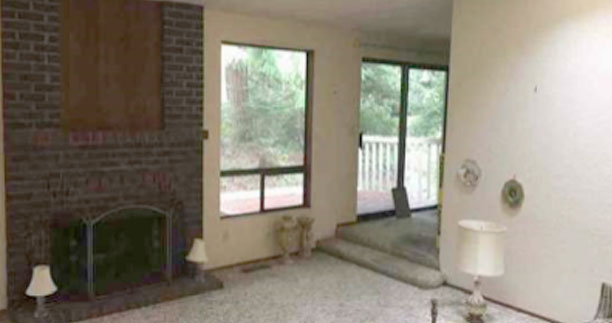
Refinishing or repainting a kitchen During Rehab
Refinishing or repainting a kitchen is one of the most cost-effective ways to modernize and refresh a dated space, particularly in a fix and flip scenario. It can drastically change the appearance without incurring the costs associated with a full remodel. Here’s a detailed guide on updating a kitchen through refinishing and repainting:
- Assessment:
- Condition of Cabinets: Before you begin, assess the cabinets’ structural condition. Are they sturdy? Do the doors close properly? If there are minor issues, they can likely be fixed during the refinishing process.
- Material: Solid wood cabinets are the easiest to refinish, but laminate and veneer can also be refinished with the right approach and materials.
- Preparation:
- Clear the Kitchen: Remove all items from the countertops and cabinets.
- Labeling: As you remove cabinet doors and drawers, label them. This ensures that they go back to their original location.
- Cleaning: Thoroughly clean all surfaces to remove grease, dirt, and other residues using a degreasing agent or a mixture of vinegar and water.
- Sanding: Sand the surfaces with a medium-grit sandpaper to remove the old finish and create a rough surface for new paint or stain to adhere.
- Repair and Fill:
- Fix Damages: Repair any damages, loose hinges, or broken pieces.
- Fill Holes: If you plan to change the hardware, fill the old screw holes with wood filler.
- Sanding (Again): Sand the filled areas until they are smooth and level with the cabinet surface.
- Primer:
- Selection: Use a high-quality primer that’s suitable for the material of your cabinets and the type of paint you plan to use.
- Application: Apply primer using brushes or rollers for even coverage. If painting laminate, ensure the primer is designed for it.
- Painting/Refinishing:
- Paint Selection: Choose a paint specifically designed for cabinets or kitchens due to the higher resistance to moisture and wear. Semi-gloss or satin finishes are popular choices.
- Stain: If you’re staining instead of painting, select the desired shade. Staining can enhance the natural wood grain.
- Technique: For a smoother finish, consider using a paint sprayer. Otherwise, foam rollers and brushes work well.
- Multiple Coats: Apply 2-3 coats, allowing sufficient drying time between coats, and sanding lightly with a fine-grit sandpaper between applications.
- Protective Finish:
- Clear Sealant: Especially if you’ve stained the cabinets, apply a clear topcoat or sealant to protect against moisture and wear.
- Let it Cure: Once painted or stained, allow the cabinets to cure for several days before reattaching hardware and putting them to regular use.
- Hardware:
- Modern Hardware: If the existing hardware is dated, consider replacing it. Modern handles and knobs can make a significant difference in the kitchen’s appearance.
- Reinstall: If using the original hardware, reinstall it. If using new hardware, drill holes as required.
- Reassemble:
- Reattach Doors and Drawers: Using the labels you placed earlier, reattach doors and drawers to their original positions.
- Adjustments: Adjust hinges as necessary to ensure proper alignment.
- Additional Considerations:
- Backsplash and Walls: While the focus is on cabinets, don’t neglect the walls and backsplash. A fresh coat of paint or a new backsplash can complement your refinished cabinets.
- Countertop Refinishing: If the countertop is laminate and showing wear, consider refinishing it as well.
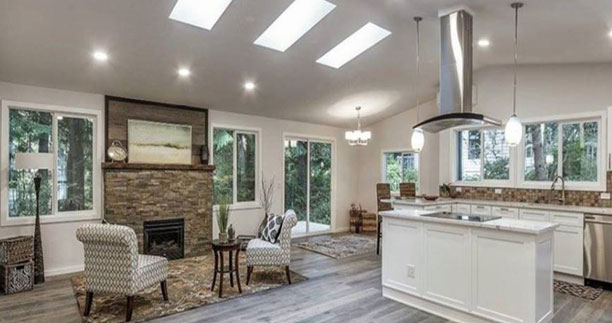
Refinishing or repainting the kitchen can drastically transform a dated kitchen into a contemporary space. When executed well, it provides a high return on investment for fix and flip properties, making the home more appealing to potential buyers.