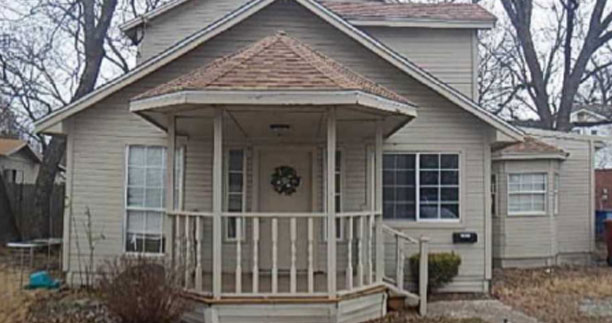
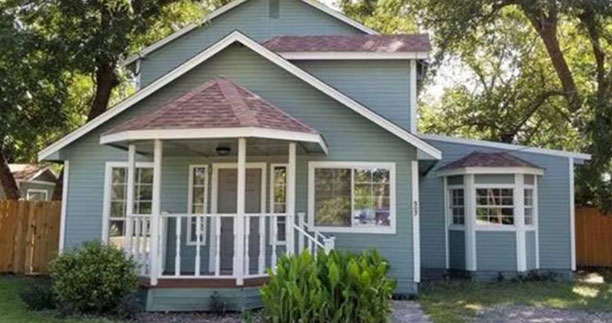
Utilizing Loan-to-Value (LTV) Ratios in Hard Money Lending: Mitigating Risk and Determining Maximum Loan Amounts
In the world of hard money lending, loan-to-value (LTV) ratios play a crucial role in determining the maximum loan amount a lender is willing to provide. As an expert in LTV ratios and lending practices, this article will provide a comprehensive explanation of what LTV ratio is, its significance in hard money lending, and how lenders calculate LTV ratios. Additionally, we will discuss the various factors considered by lenders when determining LTV ratios, explore varying LTV requirements among lenders, and provide insights on how borrowers can improve their LTV ratios to secure larger loans.
Understanding Loan-to-Value (LTV) Ratios
LTV ratio is a financial metric used by lenders to assess the risk associated with a loan. It represents the percentage of the property’s appraised value or purchase price that the lender is willing to lend to the borrower. For example, if a property is valued at $500,000 and the lender has an LTV ratio of 75%, the maximum loan amount they would offer is $375,000 (75% of $500,000).
Importance of LTV Ratios in Hard Money Lending
LTV ratios are vital to hard money lending because they determine the loan’s risk exposure and the amount of collateral supporting the loan. Unlike traditional banks, hard money lenders focus less on a borrower’s creditworthiness and more on the value of the underlying property. By evaluating LTV ratios, lenders can gauge the risk associated with a loan and tailor their lending decisions accordingly.
Calculating LTV Ratios and Considered Factors
To calculate the LTV ratio, lenders divide the loan amount by the appraised value or purchase price of the property. For instance, if a borrower is seeking a $300,000 loan for a property with an appraised value of $400,000, the LTV ratio would be 75% ($300,000/$400,000). Lenders consider multiple factors when calculating LTV ratios, including:
1. Property Appraisal:
An accurate appraisal by a licensed professional is crucial in determining the property’s value and establishing the basis for the LTV ratio.
2. Purchase Price
The actual cost at which the borrower acquires the property affects the LTV ratio, as it directly impacts the potential equity and risk associated with the loan.
3. Loan Amount
The requested loan amount contributes to the LTV ratio and determines the borrowing capacity.
Varying LTV Requirements Among Lenders
It is essential to note that different hard money lenders may have varying LTV requirements based on their risk tolerance, experience, and market conditions. Some lenders may be more conservative, capping their LTV at 70%, while others may be more flexible, allowing up to 90% LTV.
Improving LTV Ratios to Secure Larger Loans
To increase their borrowing capacity, borrowers can employ several strategies:
1. Enhance property value
Before seeking a hard money loan, borrowers can invest in property improvements and upgrades to increase its appraised value, subsequently reducing the LTV ratio.
2. Negotiate a lower purchase price
By negotiating a favorable purchase price, borrowers can minimize the loan amount, thus reducing the LTV ratio.
3. Increase down payment
Opting for a larger down payment enables borrowers to decrease the loan amount, leading to a lower LTV ratio and potentially allowing for a larger loan.
Impact of LTV Ratios on Loan Decisions
LTV ratios significantly impact loan decisions in hard money lending. Lenders typically prefer lower LTV ratios, indicating less risk exposure and potentially granting borrowers access to larger loan amounts. Higher LTV ratios may lead to more stringent loan terms or loan denial due to increased risk for the lender.
Real-life Examples and Case Studies
To illustrate the impact of LTV ratios on loan decisions, consider two scenarios:
1. Scenario A
Borrower A requests a $300,000 loan for a property with an appraised value of $400,000, resulting in a 75% LTV ratio. The lender, with a 70% maximum LTV requirement, approves the loan.
2. Scenario B
Borrower B requests a $400,000 loan for a property with an appraised value of $500,000, resulting in an 80% LTV ratio. The lender, also with a 70% maximum LTV requirement, denies the loan due to the higher risk associated with the higher LTV ratio.
Industry Standards and Trends
Research and data on industry standards and trends can offer insights to borrowers seeking hard money loans. Understanding average LTV ratios in a specific industry or region can provide a benchmark for borrowers to negotiate favorable loan terms.
Actionable Tips for Borrowers
1. Conduct thorough market research to identify lenders with favorable LTV requirements and terms.
2. Prioritize property improvements to enhance its value and reduce the LTV ratio.
3. Negotiate diligently with sellers to secure a lower purchase price and reduce the loan amount.
Conclusion
Loan-to-value (LTV) ratios serve as a critical tool in hard money lending, enabling lenders to mitigate risk and determine the maximum loan amount they are willing to provide. By understanding LTV ratios and the factors considered by lenders, borrowers can strategize to improve their LTV ratios, securing larger loans. Through real-life examples, industry trends, and actionable tips, readers can navigate the hard money lending landscape effectively and make informed borrowing decisions.
Kitchen Cabinet Refacing Update For Fix and Flip Property

Refacing The Kitchen Cabinets For Rehab
Refacing the kitchen cabinets is another popular and effective method to give a dated kitchen a new life, especially in a fix and flip scenario. Refacing involves replacing the visible fronts of the cabinets and drawers and applying a new veneer to the exposed frames. Here’s a detailed guide on updating a kitchen through refacing:
- Assessment and Planning:
- Cabinet Structure: The existing cabinet boxes should be in good condition. Refacing is about changing the exterior, not fixing the structural issues.
- Budget and Materials: Determine your budget and choose materials that fit within it. Wood veneers, laminate, and thermofoil are common refacing materials.
- Preparation:
- Clear the Kitchen: Empty the cabinets and clear the countertops.
- Remove Old Doors and Drawers: Label them if you plan to reuse any hardware or components.
- Clean and Sand: Clean the cabinet boxes thoroughly. Lightly sand the surface to ensure better adhesion of the new material.
- Choose a New Finish:
- Veneer: Select a veneer that matches the desired look, whether it’s a wood grain or a solid color.
- Matching Elements: Ensure that the new doors, drawer fronts, and veneer have a consistent finish.
- Applying the Veneer:
- Cut to Size: Measure the exposed sides of the cabinet boxes accurately and cut the veneer accordingly.
- Adhesion: Depending on the type of veneer, you might use an adhesive. Ensure a strong bond by pressing firmly and removing any air bubbles.
- Trimming: Trim any excess using a utility knife or specialized tool.
- New Doors and Drawer Fronts:
- Measurements: Double-check measurements for the new doors and drawer fronts.
- Styles: Choose a door style that aligns with your desired aesthetic and the property’s target market. Popular choices include shaker, flat-panel, or raised panel.
- Installation: Attach the new doors using hinges. Ensure they’re level and have an even gap all around.
- Hardware:
- Modernize: New handles, knobs, and pulls can significantly impact the look of the kitchen. Choose styles and finishes that complement the new cabinet fronts.
- Installation: Drill holes as required and attach the hardware.
- Optional Additions:
- Moldings and Trims: Adding crown molding or bottom trim can elevate the look.
- End Panels: If the sides of your cabinets are visible, consider adding decorative end panels for a more finished appearance.
- Soft-Close Hinges: These can add a touch of luxury and are appealing to many buyers.
- Glass Inserts: For certain cabinets, consider adding glass fronts for a touch of elegance and to break up the monotony.
- Clean Up and Inspection:
- Final Adjustments: Adjust doors and drawers for alignment and even gaps.
- Clean: Remove any dust or debris and clean the new surfaces as per the manufacturer’s guidelines.
- Complementary Updates:
- Backsplash: A new or refreshed backsplash can complement the refaced cabinets.
- Countertops: Depending on the budget, consider updating or polishing the countertops.
- Paint: A fresh coat of wall paint in a modern color can accentuate the updated cabinets.
Refacing provides a significant visual transformation without the cost and mess of a full kitchen remodel. It’s a strategic choice for fix and flip properties, offering a refreshed look that can appeal to potential buyers, increasing both the property’s marketability and value.
Kitchen Refinishing/Repainting Update For Fix and Flip Property
Refinishing or repainting a kitchen During Rehab
Refinishing or repainting a kitchen is one of the most cost-effective ways to modernize and refresh a dated space, particularly in a fix and flip scenario. It can drastically change the appearance without incurring the costs associated with a full remodel. Here’s a detailed guide on updating a kitchen through refinishing and repainting:
- Assessment:
- Condition of Cabinets: Before you begin, assess the cabinets’ structural condition. Are they sturdy? Do the doors close properly? If there are minor issues, they can likely be fixed during the refinishing process.
- Material: Solid wood cabinets are the easiest to refinish, but laminate and veneer can also be refinished with the right approach and materials.
- Preparation:
- Clear the Kitchen: Remove all items from the countertops and cabinets.
- Labeling: As you remove cabinet doors and drawers, label them. This ensures that they go back to their original location.
- Cleaning: Thoroughly clean all surfaces to remove grease, dirt, and other residues using a degreasing agent or a mixture of vinegar and water.
- Sanding: Sand the surfaces with a medium-grit sandpaper to remove the old finish and create a rough surface for new paint or stain to adhere.
- Repair and Fill:
- Fix Damages: Repair any damages, loose hinges, or broken pieces.
- Fill Holes: If you plan to change the hardware, fill the old screw holes with wood filler.
- Sanding (Again): Sand the filled areas until they are smooth and level with the cabinet surface.
- Primer:
- Selection: Use a high-quality primer that’s suitable for the material of your cabinets and the type of paint you plan to use.
- Application: Apply primer using brushes or rollers for even coverage. If painting laminate, ensure the primer is designed for it.
- Painting/Refinishing:
- Paint Selection: Choose a paint specifically designed for cabinets or kitchens due to the higher resistance to moisture and wear. Semi-gloss or satin finishes are popular choices.
- Stain: If you’re staining instead of painting, select the desired shade. Staining can enhance the natural wood grain.
- Technique: For a smoother finish, consider using a paint sprayer. Otherwise, foam rollers and brushes work well.
- Multiple Coats: Apply 2-3 coats, allowing sufficient drying time between coats, and sanding lightly with a fine-grit sandpaper between applications.
- Protective Finish:
- Clear Sealant: Especially if you’ve stained the cabinets, apply a clear topcoat or sealant to protect against moisture and wear.
- Let it Cure: Once painted or stained, allow the cabinets to cure for several days before reattaching hardware and putting them to regular use.
- Hardware:
- Modern Hardware: If the existing hardware is dated, consider replacing it. Modern handles and knobs can make a significant difference in the kitchen’s appearance.
- Reinstall: If using the original hardware, reinstall it. If using new hardware, drill holes as required.
- Reassemble:
- Reattach Doors and Drawers: Using the labels you placed earlier, reattach doors and drawers to their original positions.
- Adjustments: Adjust hinges as necessary to ensure proper alignment.
- Additional Considerations:
- Backsplash and Walls: While the focus is on cabinets, don’t neglect the walls and backsplash. A fresh coat of paint or a new backsplash can complement your refinished cabinets.
- Countertop Refinishing: If the countertop is laminate and showing wear, consider refinishing it as well.
Refinishing or repainting the kitchen can drastically transform a dated kitchen into a contemporary space. When executed well, it provides a high return on investment for fix and flip properties, making the home more appealing to potential buyers.
Kitchen Functionality Update For Fix and Flip Property Rehab
Kitchen Functionality Update For Fix and Flip Property
The kitchen is often referred to as the heart of the home, and its design and style can significantly impact the perceived value and appeal of a fix and flip property. Updating the kitchen’s design and style can make the property more competitive in the market and yield a higher return on investment. Here’s a detailed guide on this topic:
- Determine Your Target Audience:
- Demographics: Understand the primary demographic of potential buyers in the area. Are they young professionals, families, retirees?
- Market Trends: Research local market trends. What styles are currently popular and selling well?
- Cabinetry:
- Refacing: Instead of replacing old cabinets, consider refacing them with new doors and drawer fronts. This can achieve a fresh look at a fraction of the cost.
- Open Shelving: Popular in modern designs, open shelves can make a space feel more open and display attractive dishes or decor.
- Color: White or light-colored cabinets are versatile and timeless. However, dark cabinets or two-toned designs can also be trendy and appealing.
- Countertops:
- Material Choices: Quartz remains popular due to its durability and ease of maintenance. Granite, butcher block, and concrete are other options, each bringing a unique aesthetic.
- Waterfall Edges: For a modern touch, consider waterfall edges on kitchen islands or end cabinets.
- Backsplash:
- Tile Selection: Subway tiles are classic, but there are myriad tile shapes, colors, and materials to consider, from hexagonal to herringbone patterns.
- Full Wall: Extending the backsplash from the countertop to the ceiling, especially behind the range, can create a focal point.
- Flooring:
- Materials: Hardwood floors are timeless, but porcelain tiles, laminate, or luxury vinyl can also be durable and stylish.
- Pattern: Consider patterns like herringbone or chevron for added visual interest.
- Island and Peninsulas:
- Inclusion: If space allows, a kitchen island or peninsula can add functionality and become a design centerpiece.
- Features: Consider adding a sink, additional storage, or bar seating to the island.
- Appliances:
- Stainless Steel: Continues to be popular for its sleek appearance and compatibility with various kitchen styles.
- Integrated Appliances: Appliances that blend into cabinetry (like a panel-ready fridge) offer a seamless look.
- Smart Appliances: Modern buyers may appreciate appliances with smart features that can be connected to mobile apps or home automation systems.
- Lighting:
- Pendants: These can add style over islands or dining areas.
- Under-Cabinet: Provides practical task lighting and can set the mood when dimmed.
- Recessed Lights: For general kitchen lighting, these offer a clean, streamlined look.
- Color Palette:
- Neutral Tones: They provide versatility and appeal to a broad audience. Think whites, grays, and beiges.
- Accent Colors: Introduce pops of color with decor, a feature wall, or colorful cabinetry.
- Hardware and Fixtures:
- Consistency: Hardware finishes should be consistent throughout the kitchen. Whether it’s brushed nickel, matte black, or gold, consistency creates cohesion.
- Modern Faucets: Consider faucets with pull-down sprayers or touchless features.
- Architectural Details:
- Ceilings: Tray or coffered ceilings can add depth and interest.
- Moldings: Crown molding or a chair rail can introduce a touch of elegance.
- Decor and Open Spaces:
- Greenery: Potted plants or herbs can bring life to the kitchen.
- Wall Decor: Artwork, floating shelves with decor items, or even a stylish clock can enhance the kitchen’s design.
When updating the kitchen’s design and style for a fix and flip property, it’s essential to balance current trends with timeless appeal. Remember, the goal is to appeal to the broadest range of potential buyers to ensure a swift sale at a profitable price point.
Kitchen Existing Hardware Update For Fix and Flip Property
Does The Kitchen Cabinet Need A Hardware Update For Rehab OnFix and Flip Property
Refreshing or repurposing existing kitchen hardware in a fix and flip property is a budget-friendly approach that can give dated cabinets a fresh look. Here’s a detailed guide on updating existing kitchen hardware:
- Assessment and Cleaning:
- Check the Condition: Inspect each piece of hardware. Look for damage, excessive wear, or any broken parts.
- Deep Cleaning: Years of grime, grease, and dust can dull the appearance of hardware. Remove each piece and soak it in a mixture of warm water and mild dish soap. Use a soft brush to scrub away stubborn dirt. For metal hardware, consider using a metal cleaner or polish.
- Refinishing Options:
- Painting: If the hardware is in good shape but needs a color update, consider spray painting. Use a primer appropriate for the material, followed by a metal-friendly spray paint. Popular finishes include matte black, brushed nickel, and oil-rubbed bronze. Ensure pieces are hung or set on a surface where all sides can be sprayed evenly. Always paint in a well-ventilated area.
- Polishing: For solid brass or copper hardware, polishing can bring back the original shine. Use appropriate metal polish and a soft cloth.
- Distressing: For a vintage or rustic look, consider distressing painted hardware. This involves lightly sanding edges to reveal underlying layers or metal.
- Repurposing:
- Mix and Match: If some pieces are damaged beyond repair, consider a mixed hardware approach. This could mean using different knobs and pulls but in a cohesive style or finish.
- New Use: Consider repurposing handles into towel or pot holders. This can create a cohesive design element throughout the kitchen.
- Adjustments and Repairs:
- Tightening: Over time, screws can loosen. As you’re reinstalling, ensure each piece is securely attached.
- Replacement Parts: If certain parts are damaged, like screws or the spring mechanism in latches, you might find replacement parts rather than replacing the entire piece of hardware.
- Alignment: Ensure cabinet doors and drawers open smoothly. Adjust hinges if needed.
- Installation:
- Use a Template: If you had to fill old holes and drill new ones, a template will ensure consistent placement across all cabinets.
- Protect the Finish: When reinstalling painted or polished hardware, be gentle to avoid chips or scratches.
- Staging and Presentation:
- Highlight the Revamped Hardware: Ensure potential buyers notice the refreshed hardware, emphasizing the effort to maintain the home’s character while updating its appearance.
- Detailing: Consider adding shelf liners or organizing cabinet interiors. When buyers open cabinets to inspect them, a clean, fresh interior can leave a positive impression.
- Marketing:
- Before and After Photos: Showcase the transformation in listing photos. This can demonstrate the care and attention to detail given to the property’s renovation.
- Mention in the Listing: While it may seem minor, indicating that the kitchen hardware has been refreshed can appeal to buyers who appreciate both modern touches and character preservation.
Updating existing kitchen hardware is not only budget-friendly but also eco-friendly, as it reduces waste. For a fix and flip property, it’s a sustainable way to enhance the kitchen’s appearance while preserving some of the home’s original charm. It also communicates to potential buyers that the renovator values both sustainability and character.